Terminal-oh-my-posh

今天想要來分享如何在 window 上面設定像 Linux 或 Mac 相關花麗等冬端機 terminal,和以些 linux 不錯的指令。如果你們有用過 Linux,在用 window 很不習慣,尤其是指令。今天想分享如何用 Oh-my-posh 在 window 上面可以跟 Linux 的 Oh-my-zsh 有依樣效果。Window 是用在 powershell 上,他有支援很多 shell bash zsh powershell fish等等。我有寫一篇比較完整,在Medium 因此今天會寫簡短方法。

安裝工具

軟體安裝服務比較

如果你有用過 Ubuntu 都會看到大家常用 apt-get install 這命令,這個就是我稱為的安裝服務工具。他可以很快速幫助你要安裝個套件。我今天要介紹 3 個,但我會以 winget 優先用,如果 winget 沒有套件再選其他兩個。winget 是微軟開發因此我才會優先用他。我會盡可能不去商店下載。

正常來說 winget 預設鏡安裝了,如果你是 win10 都會安裝,如果指令找不到就用下方的方法。如果 winget有,那把 scoop安裝,Chocolatey就看你要挨裝嗎,我目前沒用到。

  • Winget
    先到這裡下載 ,檔案會是 Microsoft.DesktopAppInstaller_8wekyb3d8bbwe.msixbundle然後用這個指令安裝:
1
2
Set-ExecutionPolicy -ExecutionPolicy RemoteSigned -Scope CurrentUser
Add -AppPackage
1
2
Set-ExecutionPolicy -ExecutionPolicy RemoteSigned -Scope CurrentUser
Invoke-RestMethod -Uri https://get.scoop.sh | Invoke-Expression
1
Set-ExecutionPolicy Bypass -Scope Process -Force; iex ((New-Object System.Net.WebClient).DownloadString('http://internal/odata/repo/ChocolateyInstall.ps1'))

安裝工具

以下都可以在商店搜尋下載和安裝,但我想用 winget方式比較快

  • window terminal: winget install Microsoft.WindowsTerminal
  • powershell: winget install Microsoft.Powershell

Oh-My-Posh 設定

Step 1 install Nerd Font

請到以下載站下

https://github.com/ryanoasis/nerd-fonts > https://www.nerdfonts.com/font-downloads

下載完請把他解壓縮再把它安裝

Step2 把 WINDOW TERMINAL 字體改成 NERD FONT

把凱起 終端機把自行改成 剛剛下載 NERD FONT

Step3 安裝

1
2
3
4
5
#install  安裝
winget install JanDeDobbeleer.OhMyPosh -s winget

#upgrade 升級
winget upgrade JanDeDobbeleer.OhMyPosh -s winget

Step4 啟動 OH-MY-POSH

請下這個指令會把你的終端機變成花麗,這是預設主題

1
oh-my-posh init pwsh | invoke-expression

可以下這個指令看全部主體為置: Get-PoshThemes 或是有包含檔名 Get-PoshThemes -List

你可以自行換主題

1
oh-my-posh init pwsh --config "$env:POSH_THEMES_PATH\iterm2.omp.json" | Invoke-Expression

Step5 設定 prompt

上一步的方式只能暫時生效,如果開新的視窗會發現甚麼都沒變,我們要把剛剛下個指令寫進去 profile 裡面。

PowerShell profile 不同班本 profile 放不一樣為置,5.X 版本是預設版本,7.X 視我們前門安裝:

PS5.1: C:\Users\test\Documents\WindowsPowerShell
PS7.1: C:\Users\test\Documents\PowerShell

你可以手動加 profile,但有更好的方式。請下這個指令會產生檔案:New-Item -Path $PROFILE -Type File –Force

接下來我們就來編輯次 profile,把剛剛加的指令加上去就可以,我們編輯: notepad $profile 就會幫我們開剛剛建立的 profile。

1
2
3
4
#generate powershell profile
New-Item -Path $PROFILE -Type File –Force
#modify profile
notepad $profile

可以這樣加你的主體:

$env:預設路徑
你們會好奇為什麼 $env會知道預設 theme,因為 env是 powershell 環境變數,你可以下這個指令看$env所以的參數ChildItem env: 就會看到$env:POSH_THEMES_PATH 會有 theme 完整路徑。這個好處是你不用打那麼長一串。

1
oh-my-posh init pwsh --config "$env:POSH_THEMES_PATH\iterm2.omp.json" | Invoke-Expression

也可以用 url 或完整路徑

1
2
3
4
5
6
7
#full path
$themepath = 'C:\Users\test\Documents\PowerShell\shanselman_v3-v2.json'
oh-my-posh --init --shell pwsh --config $themepath | Invoke-Expression

# URL
oh-my-posh init pwsh --config 'https://raw.githubusercontent.com/JanDeDobbeleer/oh-my-posh/main/themes/jandedobbeleer.omp.json' | Invoke-Expression

可以放在跟$profile 為置,用細麵指令

1
2
$omp_config = Join-Path $PSScriptRoot ".\theme.json"
oh-my-posh --init --shell pwsh --config $omp_config | Invoke-Expression

Step6 add alias or function

我們可以加一些 alias 用像 linux 一些指令放在$profile 裡面。所有的東西都會放在$profile 裡面,他每次開新 session 都會先去讀$profile。

我先安裝以下 git and node:

1
2
3
4
#git
winget install --id Git.Git -e --source winget
#node
WINGET INSTALL OPENJS.NODEJS.ltS

以下是我的 $profile 有 alias 和加一些函數

1
2
3
4
5
6
7
8
9
10
11
12
13
14
15
16
17
18
19
20
21
22
23
24
25
26
27
28
29
30
31
32
33
34
35
36
37
38
39
40
41
42
43
44
45
46
47
48
49
50
51
52
53
54
55
56
57
58
59
60
Set-alias tt tree
Set -Alias ll ls
Set-Alias g git
#Set alias vim nvim
Set-Alias grep findstr
Set-Alias tig 'C:\Program Files\Git\usr\bin\tig.exe'
Set-Alias less 'C:\Program Files\Git\usr\bin\less.exe'

# Ultilities (Optional)
function which ($command) {
Get-Command -Name $command -ErrorAction SilentlyContinue |
Select-Object -ExpandProperty Path -ErrorAction SilentlyContinue
}

function getenv{
Get-ChildItem env:
}

function head {
param($Path, $n = 10)
Get-Content $Path -Head $n
}

function tail {
param($Path, $n = 10)
Get-Content $Path -Tail $n
}

function grep($regex, $dir) {
if ( $dir ) {
Get-ChildItem $dir | select-string $regex
return
}
$input | select-string $regex
}

function df {
get-volume
}
#get $env variable
function getenv {ChildItem env:}

# Git Shortcuts
function gs { git status }
function ga { git add . }
function gc { param($m) git commit -m "$m" }
function gp { git push }
function g { z Github }
function gcom {
git add .
git commit -m "$args"
}
function lazyg {
git add .
git commit -m "$args"
git push
}

# adding hosts shortcut
function hosts { notepad c:\windows\system32\drivers\etc\hosts }

以上你看到有 80%有 linux 指令,有興趣可以玩看看。

Plugin 套件

這裡我會介紹套件,但我只介紹比較實用也大家用的

Terminal Icons

  • 安裝
1
Install-Module -Name Terminal-Icons -Repository PSGallery -Force
  • 匯入

Import-Module Terminal-Icons

psreadline(Autocompletion)

這個套件很龐大,你們可以參考以下網站有很多我並沒介紹

  • 安裝
1
Install-Module -Name PSReadLine -AllowPrerelease -Scope CurrentUser -Force -SkipPublisherCheck
  • 匯入

Import-Module PSReadLine

以下是我放在我個 $profile:

1
2
3
4
5
6
7
8
9
10
11
12
13
14
15
16
17
18
Set-PSReadLineOption -EditMode Windows
Set-PSReadLineOption -PredictionSource History
Set-PSReadLineOption -PredictionViewStyle ListView
Set-PSReadLineKeyHandler -key Tab -Function Complete
Set-PSReadLineKeyHandler -Key Tab -Function MenuComplete
Set-PSReadlineKeyHandler -Chord ctrl+x -Function ViExit
Set-PSReadLineKeyHandler -Chord 'Ctrl+d' -Function DeleteChar
Set-PSReadlineKeyHandler -Chord ctrl+w -Function BackwardDeleteWord
Set-PSReadlineKeyHandler -Chord ctrl+e -Function EndOfLine
Set-PSReadlineKeyHandler -Chord ctrl+a -Function BeginningOfLine
Set-PSReadLineKeyHandler -Key Alt+B -Function SelectShellBackwardWord
Set-PSReadLineKeyHandler -Key Alt+F -Function SelectShellForwardWord

# CaptureScreen is good for blog posts or emails showing a transaction
# of what you did when asking for help or demonstrating a technique.
#ctrl+c and ctrl+d to copy terminal
#ctrl+v to paste
Set-PSReadLineKeyHandler -Chord 'Ctrl+d,Ctrl+c' -Function CaptureScreen

這個望佔有很多功能可以加進去,有人寫好 powershell 你只要加進去就可以用,他可以自動加符號如 (),'',"",{}.[]

https://raw.githubusercontent.com/PowerShell/PSReadLine/master/PSReadLine/SamplePSReadLineProfile.ps1

你可以下這個指令來看 psreadline 的鍵和功能,上方有設新的鍵他也會 update,非常實用指令:

1
Get-PSReadLineKeyHandler

PSFzf (fuzzy finder)

我捫其實是用在 powershell,因此需要安裝 PSFZF,他會把 FZF 包在裡面

  • 安裝
1
2
scoop install fzf #install fzf
Install-Module -Name PSFzf -Scope CurrentUser -Force #install psfzf
  • 匯入
1
2
3
Import-Module PSFzf
# Override PSReadLine's history search
Set-PsFzfOption -PSReadlineChordProvider 'Ctrl+f' -PSReadlineChordReverseHistory 'Ctrl+r'
  • Ctrl+f: 可以濫你歷史紀錄用的指令
  • ctrl+r: 搜尋目錄所有檔案
  • Alt+c: 可以進子目錄或目錄

這個非常方便如果你要搜尋特別檔案就可以已用 ctrl+r 或是進入任何目錄也可以用 atl+c

Layout

我們可以用調高度 fzf

1
2
3
4
#輸入指令,下次要用時還需要再輸入指令
$(fzf --height 40% --reverse)
#寫成函數 方面下次輸入函數名稱啟動功能
function f2{$(fzf --height 60% --layout=reverse --border)}

你也可以把預設的參數改成你想要的高度:

1
$env:FZF_DEFAULT_OPTS='--height 40% --layout=reverse --border'

Preview

可以看歡看檔案內容,不需要開啟

我們需要先安裝 bat套件: ‵scoop install bat‵

1
2
3
4
#
function ff{
nvim $(fzf --preview 'bat --style=numbers --color=always --line-range :500 {}')
}

可以用上面方式也可以開啟指定的文字 textedior,如 notepad vi vim neovim nano 等等

1
notepad $(fzf --preview='cat {}')

Search syntax

Token Description
'wild Items that include wild
!^music Items that do not start with music
!.mp3$ Items that do not end with .mp3
!test Items that do not include test
^music Items that start with music
.mp3$ Items that end with .mp3

衝突 ALT+c

如果你用 Set-PSReadLineOption -EditMode emac alt+c 就可能會無法用因為他跟 fzf alt+c 有衝突。

如何解決這問題,有兩個方法,一個是把 emac 改成 window 模式或是移除 EditMode。第二方法用下面指令:

1
2
3
4
5
6
#access directory
Get-ChildItem . -Recurse -Attributes Directory | Invoke-Fzf | Set-Location

#edit file, please change your text edior 可以直接修該檔案,用你想要文字編輯器如NOTPAD
Get-ChildItem . -Recurse -Attributes !Directory | Invoke-Fzf | % { notepad $_ }

我建議大家如果享用把他寫成函數,這樣下指令就會執行他如下面方式,你只要下 FzfNav就會執行跟 ALT+c 一樣效果

1
function FzfNav { Get-ChildItem . -Recurse -Attributes Directory | Invoke-Fzf | Set-Location }

fd

如果你想樣把預設的 fzf find 用成 fd 或 ag,可以用下面方式。 FD 和 ag 又是另外搜尋套件比 find 還快。如果你是用 linux,fzf 是用 find 在幫你搜尋。

我在我不多說如何用 ag 和 fd,有機會再寫一章關於他們。

他有一個好處如果你不想要搜巡當案落資料夾可以把他寫進 .ignore檔案或 .gitignore,他就會忽略這檔案
你也可以用剛剛上面有用到你 search syntax ! 不忽略。

  • 安裝
1
2
3
4
5
6
7
8
# fd安 裝
#scoop
scoop install fd
#winget方式
winget install sharkdp.fd

#ag 安裝
winget install "The Silver Searcher"

更多關於 fd az

1
2
3
4
5
6
7
8
9
#add fd to fzf as default

# exclude .git
$env:FZF_DEFAULT_COMMAND = 'fd --type file --follow --exclude .git'
#include hidden files, exclude .git
$env:FZF_DEFAULT_COMMAND = 'fd --type file --follow --hidden --exclude .git'

#add ag to fzf as default
$env:FZF_DEFAULT_COMMAND="ag -l --hidden --ignore .git"

fd:搜尋檔案或目錄,跟 find locate 差不多但比它們還快
ag:搜尋檔案內容

Z or zoxide, directory jumper

他跟 cd 指令很像,他會把你剛剛用 cd打的路徑記錄起來,下次你就可以用 z 打剛剛最後目錄就可以。列如:
cd /home/user/test
z test

  • 安裝
1
Install-Module -Name Z –Force

fastfetch

果果你想要顯示你電腦想關資訊,可以用這個套件
可以看下方連結看更多訊息:

fastfetch > awesome-getch 很多類似相關特件

1
2
3
4
5
6
7
8
9
10
11
12
13
14
15
16
17
18
19
20
21
22
23
24
25
#generate config 產生config檔案
fastfetch --gen-config
# 為置: window: C:\Users\test\.config\fastfetch\ config.jsonc
#load customer cfg:
fastfetch --load-config /path/to/config_file
# example: fastfetch --load-config .\aa.jsonc

#SHOW ONLY HARDWARE: 電腦硬體相關
fastfetch -c hardware

#PRINT LOGOS:
fastfetch --print-logos

#USE LOGO:
fastfetch --logo sparky
#print all logo:
fastfetch --print-logos
#USE CERTAIN COLOR :
fastfetch --color blue
#COLORS 1-9, 5 BLINKING:
fastfetch --color 5
#HELP - BUNCH OF OPTIONS:
fastfetch --help
#All filesytem paths can be:
fastfetch --list-data-paths

還有更多範例可以參考:

終端機相關設定

反白文字自動復製

我們可以只要選擇反白文字會幫我們自己復製

我們需要在終端機 settings.json 做設定,可以按此鑑開啟檔案 ctrl+shift+,

方法 1: terminal settings.json 檔案裡面 profile 加

copyonselect=true

方法 2:也可以把這兩行 function 加進$profile

1
2
3
You can also automatic add into porfile
function cpy { Set-Clipboard $args[0] }
function pst { Get-Clipboard }

複製多行文字或程式會跳出提示

terminal settings.json 檔案,profile 加

Multipastingwarming=false

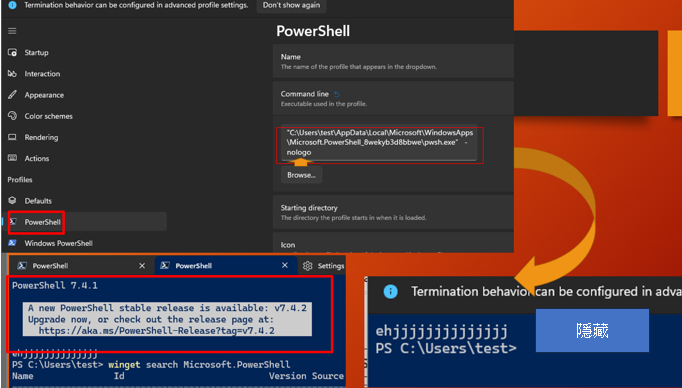
把 powershell 版本在終端機隱藏

請開啟終端機的設定,選 powershell,點 command line 或命令列,加 -nologo 加進去,如下面:

1
"C:\Users\test\AppData\Local\Microsoft\WindowsApps\Microsoft.PowerShell_8wekyb3d8bbwe\pwsh.exe" -nologo

window 相關命令

winget

  • 版本 winget version:winget –version
  • 搜尋套件 Search pkg: winget search <packagname>
  • 安裝套件 Install pkg: winget install <packagname>

scoop

  • 安裝多個套件: scoop install curl sudo jq
  • 檢查已安裝本機:scoop list
  • 套件資訊 作者等: Scoop info <package>
  • 套件移除: Scoop uninstall <package> , -p cfg 也刪
  • 更新所有套件: Scoop update *

總結

我們來做一些總結設定

1
2
3
4
5
6
7
8
9
10
11
12
13
14
15
16
17
18
19
20
21
22
23
24
25
26
27
28
29
30
31
32
33
34
35
36
37
38
39
40
41

#Step1: install 安裝
winget install JanDeDobbeleer.OhMyPosh -s winget
#upgrade 升級
winget upgrade JanDeDobbeleer.OhMyPosh -s winget
# Step2 安裝nerd font, 把終端機改成powershell 也順便把font 改成nerd font


#Step3 啟動 預設主題
oh-my-posh init pwsh | invoke-expression
#改你要個主題,可以用
oh-my-posh init pwsh --config "$env:POSH_THEMES_PATH\iterm2.omp.json" | Invoke-Expression

#Step4建立prompt/profile
New-Item -Path $PROFILE -Type File –Force

# 修改 $profile
oh-my-posh init pwsh --config "$env:POSH_THEMES_PATH\iterm2.omp.json" | Invoke-Expression


# Step5 匯入套件
Import-Module Terminal-Icons
Import-Module PSReadLine
Set-PSReadLineOption -EditMode Windows
Set-PSReadLineOption -PredictionSource History
Set-PSReadLineOption -PredictionViewStyle ListView

Import-Module PSFzf
# Override PSReadLine's history search
Set-PsFzfOption -PSReadlineChordProvider 'Ctrl+f' -PSReadlineChordReverseHistory 'Ctrl+r'


#其他指令
Get-PoshThemes #顯示所有主題
Get-PoshThemes –List #顯示所有主體的檔名

Get-ChildItem env: #列出 $env
Get-PSReadLineKeyHandler #顯示psreadline
#終端機熱鑑
ctrl+shift+, => 開啟therminal settings.json
ctrl+shift+p =>show all hotkey

我建立其他主體如果你不喜歡可以到此處看我用 segement 建立主體segment 客製主體。可以參考我下面有標示不同主題和名稱:
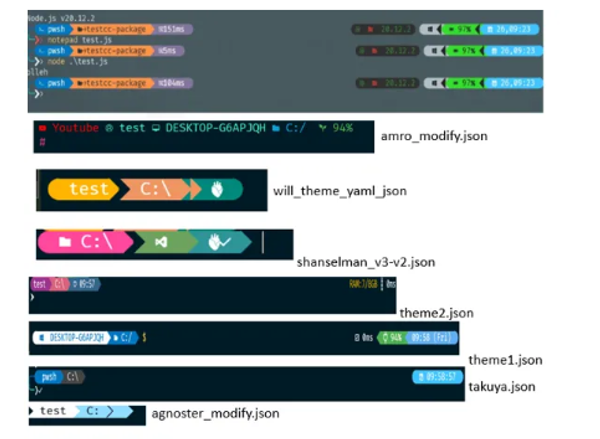
我有寫一個自動化有機會可以來這下載就不用手動安裝,來此連結下載 ,請用這個 powershell script setup_testing_automation_me.ps1

reference