UV Python Management
今天想要分享快速使用 UV 方式,不太會去多介紹它,如果你想更了解可以去我這篇文章有寫很多內容,但它是英文。我希望這裡放一些可以馬上就已用指令。
我想信大家都有用過 Python 都知道用 venv 是為了要獨立環境,用 pip or poetry 是為了裝套件等等。有時候用起來很麻煩,UV 解掉所以問體。剛剛提到的兩個是不同工具,UV 把這些用再一起,換句話說就是一個 UV 就可以有虛擬環境,套件管理等等功能,最重要是它是用 RUST 開發的因此很快。如果想了解更多請到可以到它官網看。
Traditional Way 傳統方式 (venv)
下面方式就是我們以前最常用的:
- create venv
- activate venv
- pip 安裝套件
- 把套件匯出
1 | mkdir withoutUV_Project #create a project |
今天想要分享快速使用 UV 方式,不太會去多介紹它,如果你想更了解可以去我這篇文章有寫很多內容,但它是英文。我希望這裡放一些可以馬上就已用指令。
我想信大家都有用過 Python 都知道用 venv 是為了要獨立環境,用 pip or poetry 是為了裝套件等等。有時候用起來很麻煩,UV 解掉所以問體。剛剛提到的兩個是不同工具,UV 把這些用再一起,換句話說就是一個 UV 就可以有虛擬環境,套件管理等等功能,最重要是它是用 RUST 開發的因此很快。如果想了解更多請到可以到它官網看。
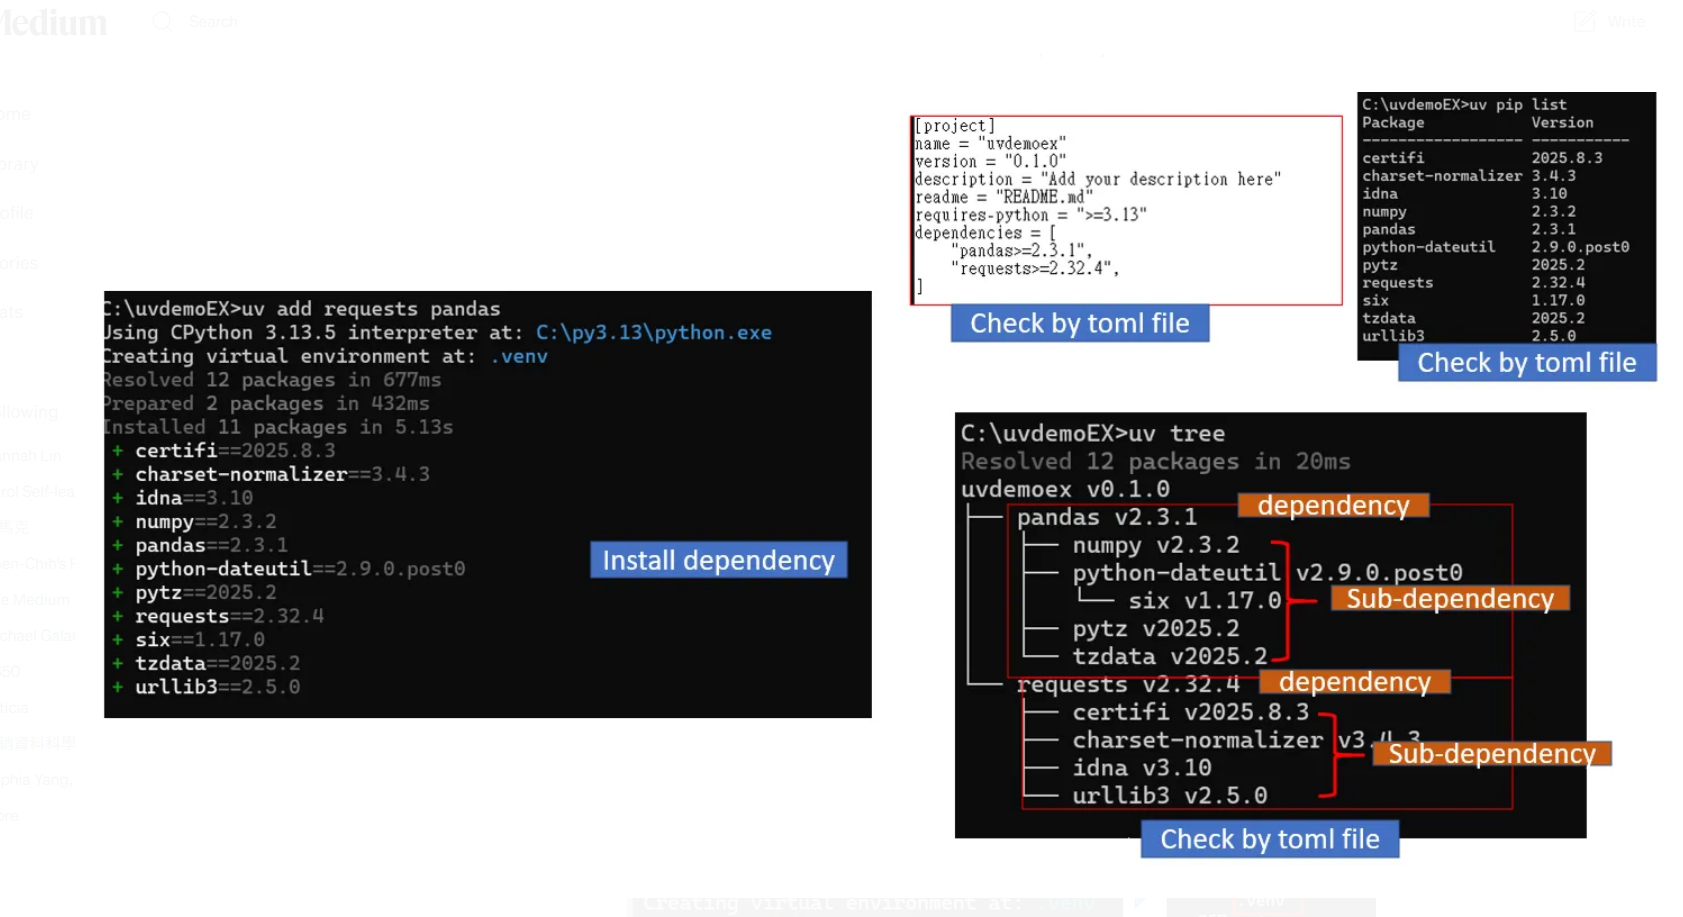
Notice when you just install dependency like request or selenium, it install other package, this is called the transitive dependencies or sub-dependency. Some packages rely on other internal packages (transitive dependencies).
UV 安裝
你可以到下面兩個網址去下載方式,我只會基本方式,它有很多方式都可以用
- mac /linux:
1 | curl -LsSf https://astral.sh/uv/install.sh | sh |
- mac
1 | brew: brew install uv |
- pip
如果打算用 uv 就不要再去用 pip,和傳統的虛擬環竟 env. 會汙染現有環境
1 | pip: pip install uv |
- window(powershell)
1 | powershell -ExecutionPolicy ByPass -c "irm https://astral.sh/uv/install.ps1 | iex" |
安裝 Python
Note:
UV support 支援
>=python3.7
- List installed python
可以用這看目前安裝那幾個 Python 版本
1 | uv python list --only-installed |

- List of available python version
列出支援 python 版本也會標示這台已安裝過的 python 版本。
1 | uv python list |
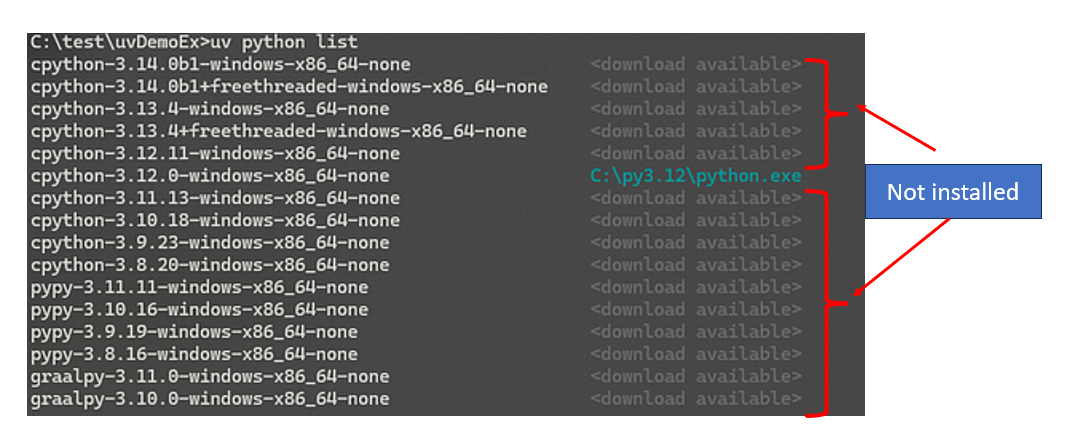
From the above picture you will have realize it will list all python version that you can installed, also if installed it will also mention with a different color.
- Install specific python:
從上面看到可以支援那個版本就可以透過它來安裝你想要版本
1 | uv python install 3.8 |
or
1 | uv python install '>=3.9 <3.11' |
- Uninstall command:
1 | uv python uninstall 3.8 |
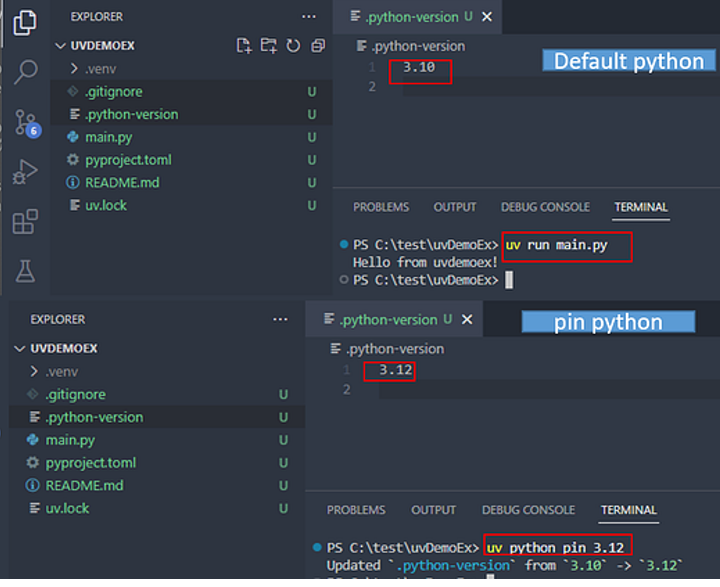
- Pin python version
Pin the current project to use a specific Python version
1 | uv python pin 3.13 |
UV 應用範例 UV Example and Cases
uv init 建立專案 Create new project
如果你要用 uv 你一定要下 uv init 它就會建立 uv 獨立環境。UV 是一個獨立環境,就像之前有用過 venv 等等。
我們來建立專案,可以兩種方式:
- 方法 1: uv init <專案名稱>
- 方法 2: uv init
方法 1: uv init <專案名稱>
Syntax:
uv init <projectName or directory Name>
1 | #remove uvDemoEx directory, if you don't have then skip this |
方法 2: 手動建立資料夾,再進資料夾在下 uv init
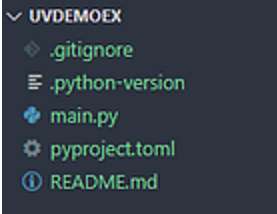
當你下 上面任何方式的 uv init 它都會自動產生以下檔案:
pyproject.toml: 安裝套建 dependency.python-version: 專案用的 python 版本,會用到uv pin.gitignore: ignore 當你要推到 github。README.md: 專案文件介紹說明
uv add 安裝套件 dependency
如果你想要安裝套件可以用這兩種方式
uv addmyproject.toml搭uv syncuv pip
uv add
syntax:
uv add <pkg name>
1 | uv add requests pandas numpy |
安裝完你會發現它會幫你安裝的 dependency 更新到myproject.toml
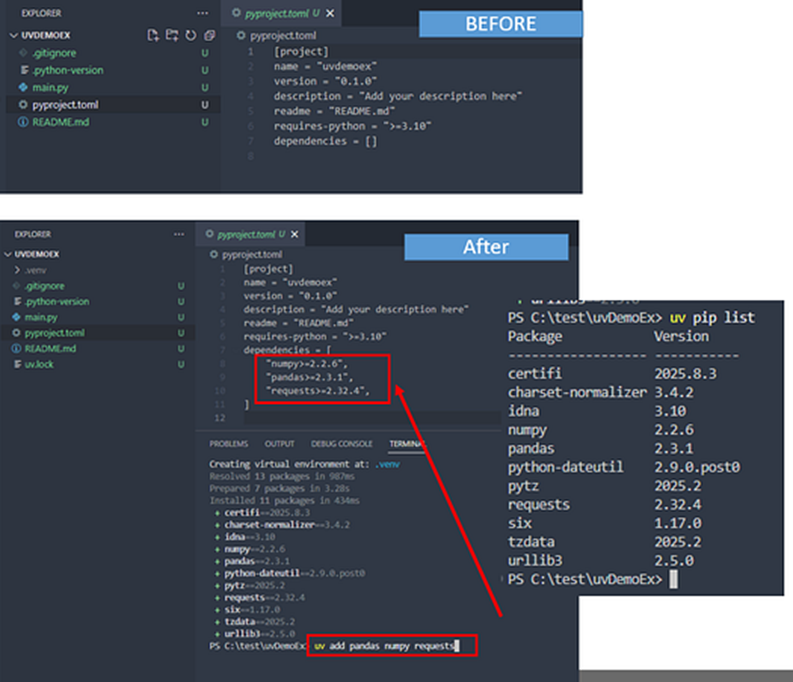
myproject.toml
你也可以在mypoject.toml file 寫要安裝的 dependency,然後用 uv sync 它也會幫你安裝。如果要移除也是這樣把 dependency 移除就好。
你也可以用uv pip uninstall <package_name>
uv pip
如果你習慣用傳統pip方式
- 安裝套件
1 | uv pip install <dep> |
- 列印安裝套件
1 | uv pip list |
uv tree
剛剛我用uv add 安裝套件,我們可以用 uv tree 來看這台所安裝到的套件,類似 pip list 但比他好很多。你會發現它會顯示套件會用那些 sub-dependency。我們都知道如果安裝一個套件一定會用到其他套件,‵uv tree‵ 會顯示出來告訴你關聯性。
uv run 執行程式
如股你要跑 python 程式就下uv run 它就會跑,同時你跑時你會發現會多出來 .venv 等檔案會自產生。
下面寫一個簡單程式:
1 | def main(): |
再用 run 執行程式:uv run main.py
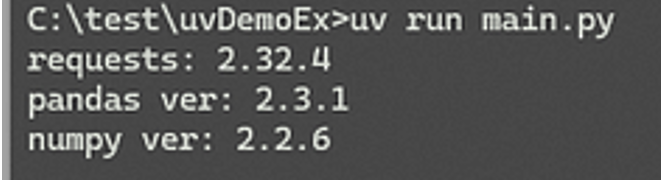
你會發現如果你用uv run 它會多出來兩個檔案:
.venv:在 uv default 就已經用 venv 獨立環境,不被外面污染。他會隔离性 (Isolation),跟自動識別幫它隔离。.uvlock:检查套件與你的项目之間的兼容性,包括套件版本和 Python 版本,精確且完全相容的版本組合,然后把它们鎖定下来。
venv
如我上面有說,如果你用uv run 它會自動幫你建立.venv隔离性 (Isolation),你可以手動刪除再建新的,用下面任何方式:
uv venv
uv venv <venc_name>
給特定 python 版本:
uv venv --python 3.13
如果你系統上沒有安裝 3.13,你下這個它會幫你安裝 3.13 版本

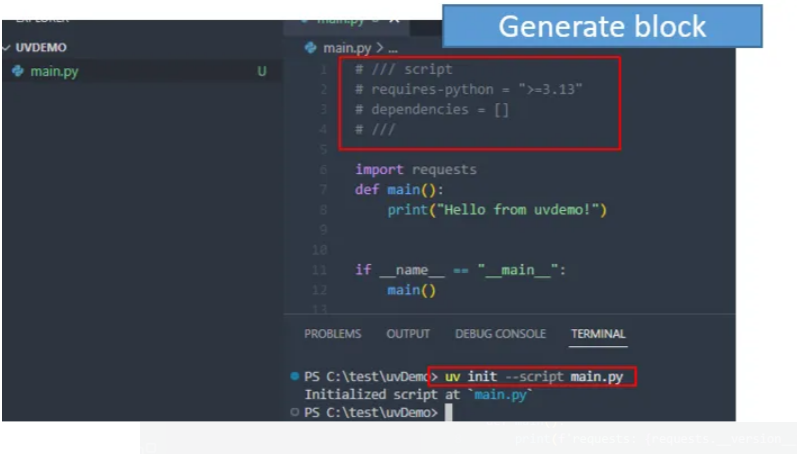
Script header block –script
如果你不想要用 家在myproject.toml檔案,你可以加到你的主程式,你只要下:
uv init --script main.py
你的 main.py 最上面就會出現像下面這樣,你就可以在這改你要的 dependencies 或 python 版本。其實這跟原本加在myproject.toml一樣只是不用特別加在另外檔案
1 | # /// script |

This # /// script ... # /// block (where you declare dependencies directly inside the script) is basically your way of telling UV exactly how to run this specific Python file. It acts like a mini-pyproject.toml or requirements.txt for that script alone.
Real Case example
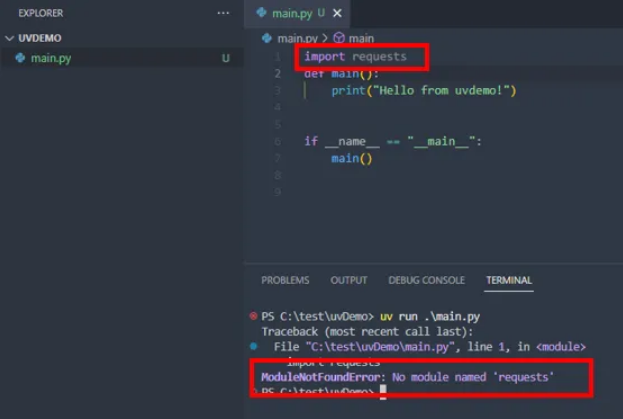
- Step1: import module 匯入套件
一開始套件沒安裝,你匯入會找不到。
- Step2: 執行 script
需要執行 script option:
uv init --script main.py>
- Step3: 安裝套件
把 dependencies 加上 requests 就會安裝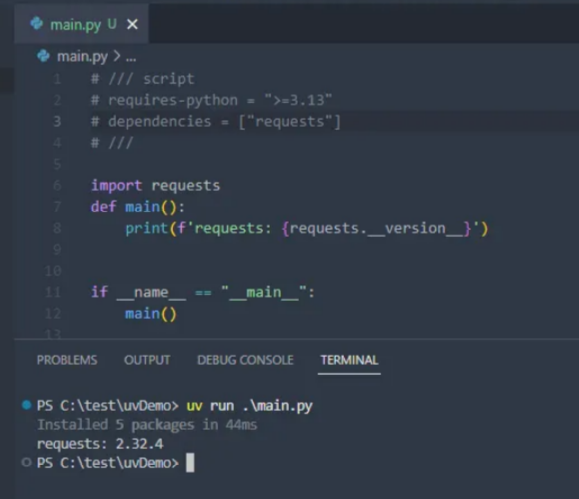
再跑程式就可以
總結:
- 你要利用
myproject.toml跟uv add就會用uv init。 - 利用
--script想用一個主程式處理所有事
UV other tool
uv tool
syntax:
安裝移除:
uv tool [install | uninstall] <toolName>
檢查安裝列:uv tool list
全局可用性 (Global Accessibility):它將工具安裝到你的系统路径(PATH)上,讓你可以在任何目錄下的终端里直接運行這個工具。
利用獨立環境 (Isolated Environment):建一個獨立的、隔离的環境来安裝’,确保工具的 dependeny 不會和你的項目 dependeny 發生衝突。
1 | #install tool |
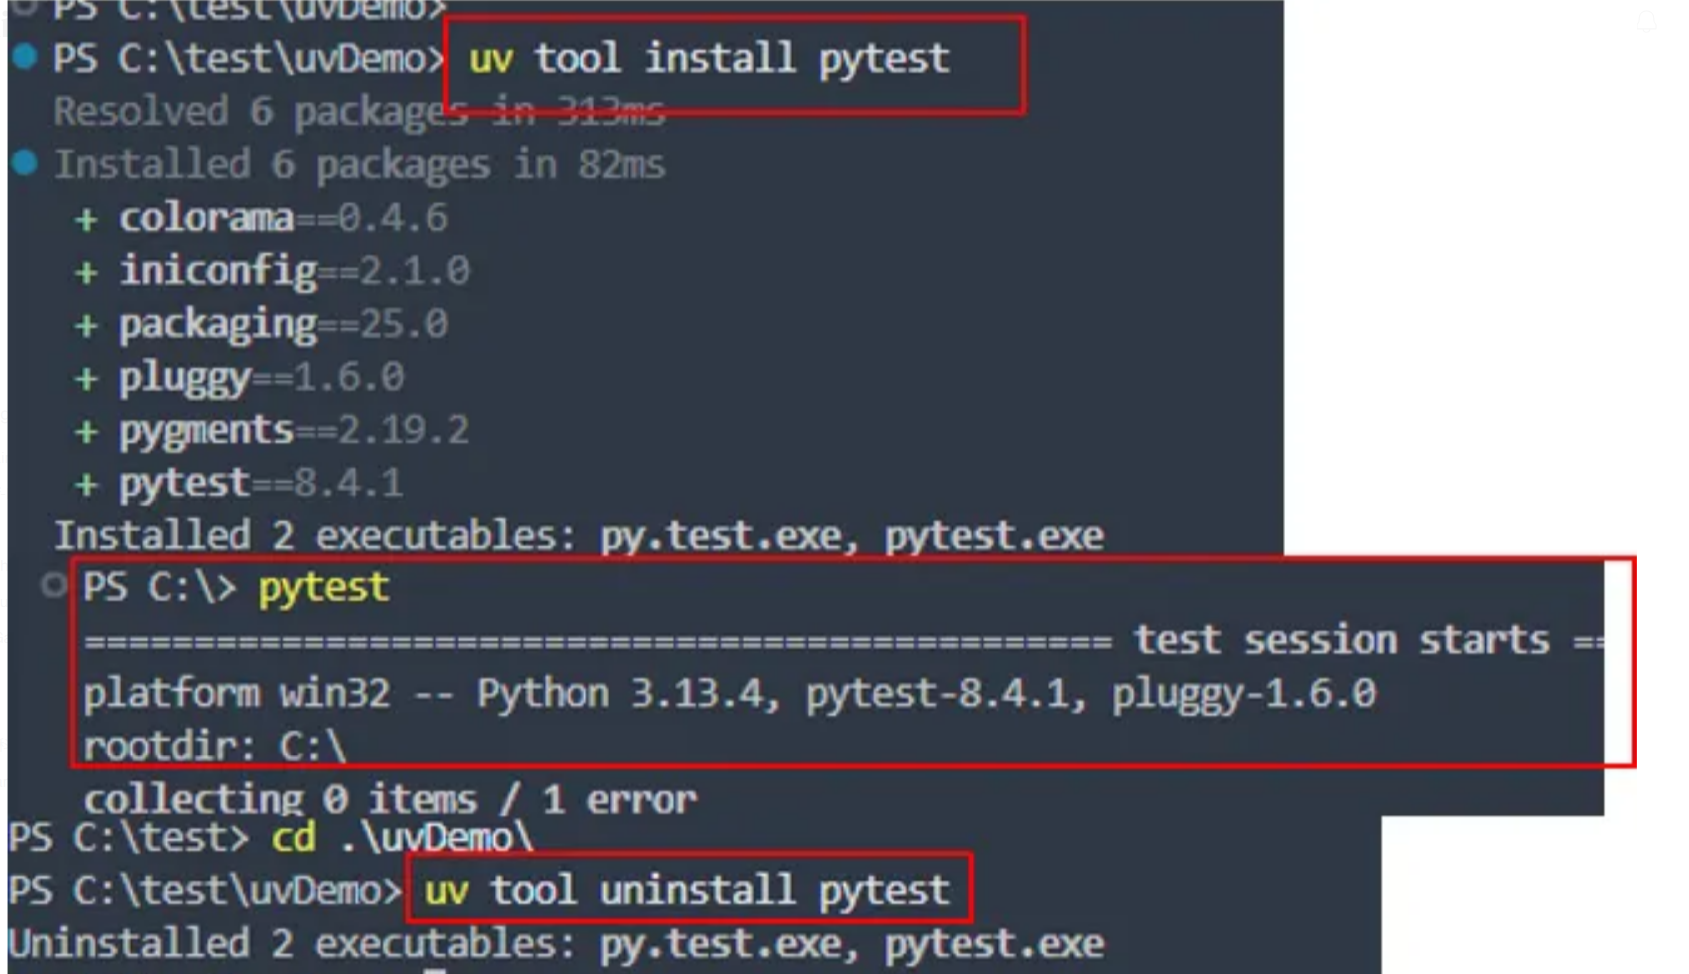
最常用的工具:
Linters and Formatters:
- Formatters: black
- Linters: ruff, flake8
- Type Checkers: mypy
- HTTP Clients: httpie
- Testing: pytest
Build and Dependency Management:
- pip
- pip-tools
- Poetry
uvx install tool temporarily
uvx 是 uv tool run縮寫,它們是一樣意思, 它的目的是不會安裝到你系通上,它會安裝在一個 temp 位置。
1 | #install ruff |